
 help
help Update your cox.net email settings in Outlook, Mail on Mac and other third-party email clients
If you have a cox.net email address that has been transitioned to Yahoo Mail and are using a third-party email client such as Outlook or Mail on Mac to download, read and send email messages from this account, you'll need to generate an app password to use with your email client, and also update the incoming and outgoing mail server settings in your email client.
Generate an app password (required first step)
Third-party email clients, such as Outlook and Mail on Mac, require you to enter a single password to sign in and access your cox.net email account. An app password is a randomly-generated code that gives a non-Yahoo app permission to access your Yahoo account. You'll only need to provide this code once to sign in to your third-party email client, but you must use the app password and not your regular account password to receive and send email messages using this client.
- Sign in to your Yahoo Account Security page.
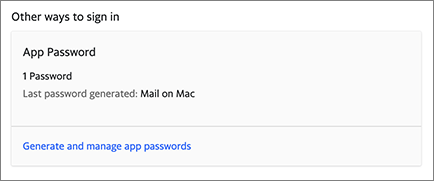
- Go to the "App Passwords" section of the page and click Generate app password or Generate and manage app passwords.
- Click Get started.
- Enter your app's name in the text field.
- Click Generate password.
- Copy the password and open your third-party email client. You'll use this as your email account password in your third-party email client settings.
App passwords remain active even if you change your main cox.net account password. To invalidate an app password, you must delete it. Read our app password help article for the steps to delete an app password.
Update your cox.net email settings in Outlook
Note: The steps below are for updating Outlook 2010, 2013, 2016, and 365.
Before you update your email settings, make sure you've generated an app password and have it available to use. You must use an app password to sign in to your cox.net email account with Outlook versions 2010, 2013, 2016, and 365.
First, open Outlook and access your account settings and the repair option:
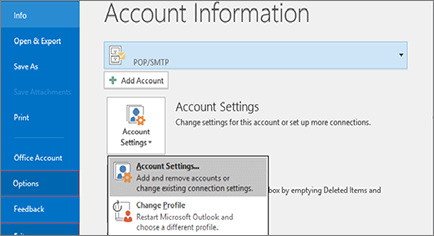
- Click File | click the Account Settings drop-down menu arrow | choose Account Settings.
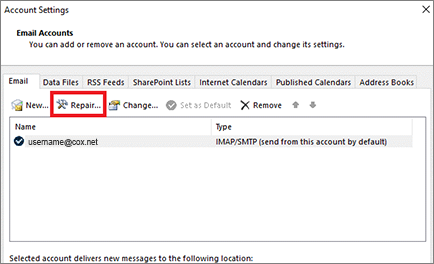
- Choose your cox.net email address by clicking on it.
- Click Repair in the navigation menu that's above your email address.
- Click the down arrow next to Advanced options and select the Let me repair my account manually checkbox.
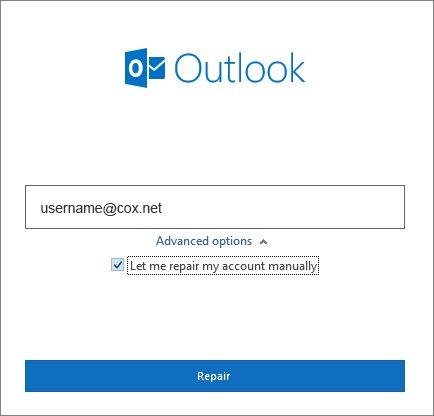
- Click Repair.
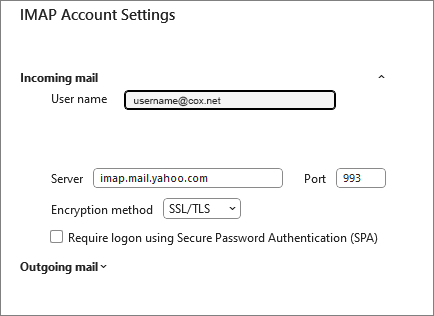
- Make sure your cox.net email address is correct in the User name field.
- Enter the app password you previously generated for this client in the Password field.
Next, update your incoming and outgoing mail settings. If you're using IMAP for incoming mail, use the server and port information for IMAP settings listed below. If you're using POP for incoming mail, use the server and port information for POP settings listed below.
IMAP settings
Server: imap.mail.yahoo.com
Port: 993
Encryption method: SSL/TLS
POP settings
Server: pop.mail.yahoo.com
Port: 995
Enable the checkbox for This server requires an encrypted connection (SSL/TLS)
Once your incoming mail server settings are updated, click the down arrow next to Outgoing mail to open the outgoing mail settings. Replace any existing outgoing mail server settings with the following:
Server: smtp.mail.yahoo.com
Port: 465
Encryption method: SSL/TLS
Enable the checkbox for My outgoing mail server requires authentication and select Use same settings as my incoming mail server.
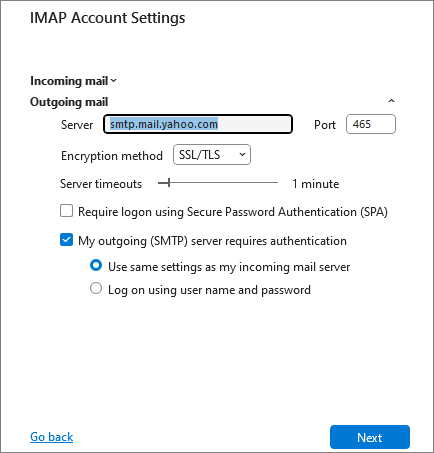
After you've updated your incoming and outgoing mail server settings, click Next.
A message telling you "Account successfully repaired" will confirm your settings have been successfully updated.
Update your cox.net settings in Mail on Mac
Before you update your email settings, make sure you've generated an app password and have it available to use. You must use an app password to sign in to your cox.net email account with Mail on Mac.
First, open Mail on Mac and access your server settings:
- Click Mail | Preferences | Accounts. In newer versions of Mail on Mac, you may instead need to click Mail | Settings | Accounts.
- Choose your cox.net email address by clicking on it.
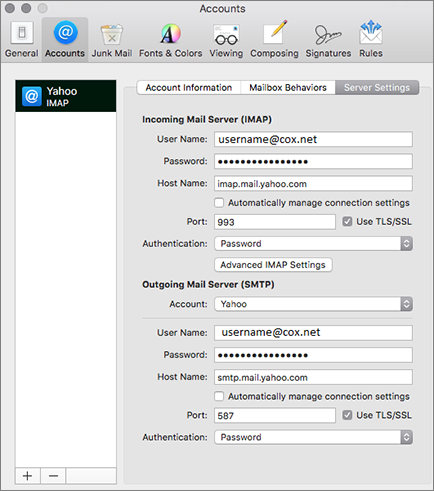
- Click Server Settings.
- Remove the checkmark from Automatically manage connection settings.
- Make sure your cox.net email address is correct in the User Name fields for both the Incoming Mail Server and Outgoing Mail Server sections of the screen.
- Enter the app password you previously generated in the Password fields for both the Incoming Mail Server and Outgoing Mail Server sections of the screen.
Next, update your incoming mail settings. If you're using IMAP for incoming mail, use the server and port information for IMAP settings listed below. If you're using POP for incoming mail, use the server and port information for POP settings listed below.
IMAP settings
Server: imap.mail.yahoo.com
Port: 993
Encryption method: TLS/SSL (make sure the TLS/SSL checkbox has a checkmark in it)
POP settings
Server: pop.mail.yahoo.com
Port: 995
Encryption method: TLS/SSL
Next, update your outgoing mail settings:
- Click the arrows for the Account drop-down list that's in the "Outgoing Mail Server (SMTP)" section of the screen.
- Choose Edit SMTP Server List from the drop-down list.
- Enter your previously-generated app password in the Password field if you didn't already update your password for your outgoing mail settings.
- Remove the checkmark from Automatically manage connection settings.
- Update your host name and port with the information below:
Host name: smtp.mail.yahoo.com
Port: 587
Use TLS/SSL (make sure the Use TLS/SSL checkbox has a checkmark in it)
Authentication: Password
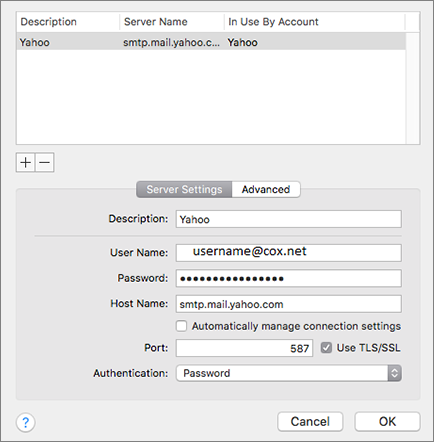
- Click OK.
- Click Save (the button is located in the bottom right side of the screen).
You may see a "Verifying Server Settings" message for a few seconds. Once Mail on Mac has finished verifying your new settings, you may close the Accounts screen.
IMAP, POP and SMTP settings for other third-party email clients
If you're using a different third-party email client not listed here, you'll still need to update your incoming (IMAP or POP) and outgoing (SMTP) mail server settings, and in most cases, generate an app password to use to sign in to your cox.net email account using the third-party email client.
Make sure your email client uses the settings below.
User name: Your cox.net email address
Password: Generate and use an app password (see the "Generate an app password" section of this article to learn how to get an app password)
Incoming mail settings:
IMAP settings
Server: imap.mail.yahoo.com
Port: 993
Encryption method: SSL/TLS
POP settings
Server: pop.mail.yahoo.com
Port: 995
Encryption method: SSL/TLS
Outgoing mail settings:
Server: smtp.mail.yahoo.com
Port: 465 or 587
Requires SSL: Yes
Requires TLS: Yes (if available)
Requires authentication: Yes
Remember - You can also read and send emails for your cox.net email account and get access to all of Yahoo Mail's great features by signing in to Yahoo Mail on desktop or mobile web, or by using the Yahoo Mail app for iOS or Android.